scolv
scolv is the main interactive tool to revise or review the origin information like picks, location, depth and time and magnitudes. Therefore scolv is divided in 4 logical units:
- ”Location” tab (Fig. 5-10)
- ”Magnitude” tab (Fig. 5-14)
- ”Events” tab (Fig. 5-16)
- “Manual picker” (Fig. 5-17)
scolv provides the whole functionality to review and revise earthquake parameters. The ”Location” tab shows detailed information of the associated phases and the residuals from the chosen origin additional information about the hypocenter, time, station distribution, helps to find outlier.
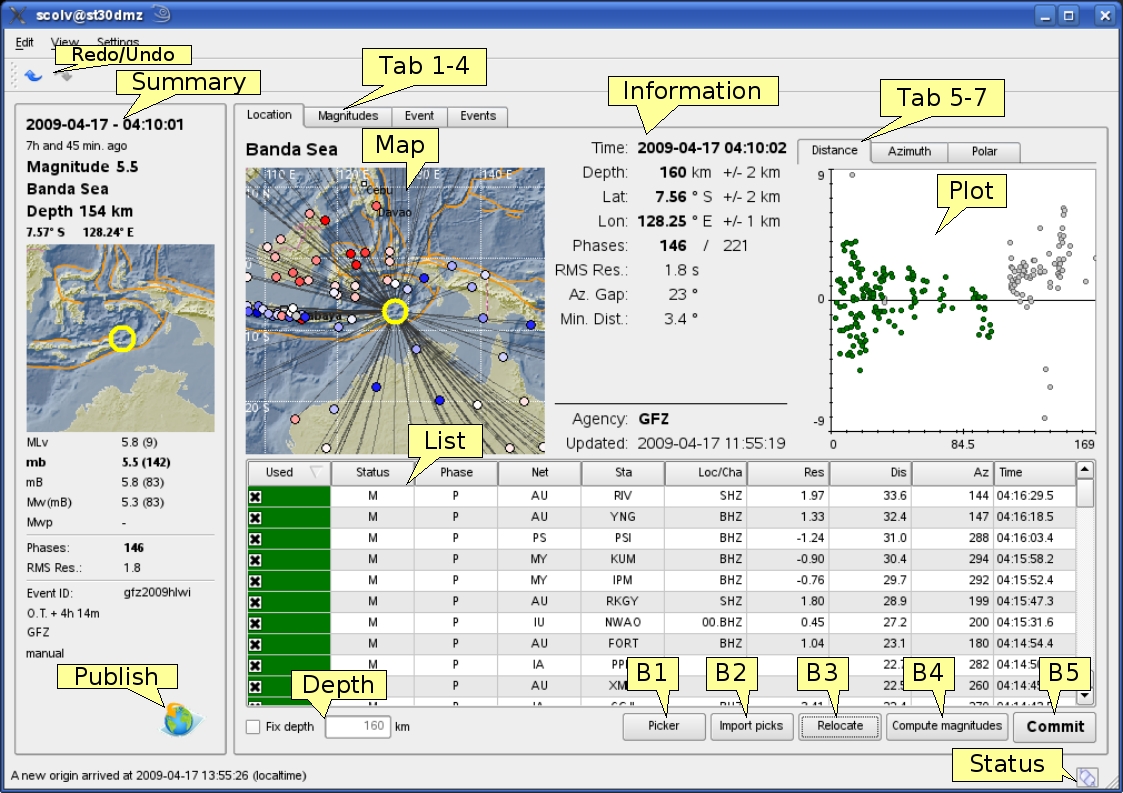
Figure 5-10: Location tab of the scolv. Redo/Undo = Switch to last/next location result; Tab1-4 = Location/Magnitude/Event/Events tab; Map = map with the event location, associated stations, the residuals (color-coded: red-positive, blue-negative) and ray paths; Information = Origin information including time, epicentre, depth, number of used and available phases, RMS, azimuthal gap and minimum station distance; List = Table of associated arrivals (phases) containing stream information and phase information; Tab 5-7 = Arrival residual plots against distance and azimuth (linear and polar) in a separate tab; Plot = Arrival residual plot (distance over residual in seconds); Depth = Checkbox to fix to a defined depth; B1 = Open Manual Picker; B2 = Import picks of other automatic origins belonging to the same event; B3 = Relocate with the given arrival information; B4 = Compute magnitudes; B5 = Commit origin; Status = Connection status; Summary = all information of the preferred origin of the actual event; Publish = Button to publish the event (s Figure 4-19).
The residuals for all stations can be displayed against the distance of the station from the source location or against the azimuth in linear (Figure 5-11) or polar projection (Figure (5-12).
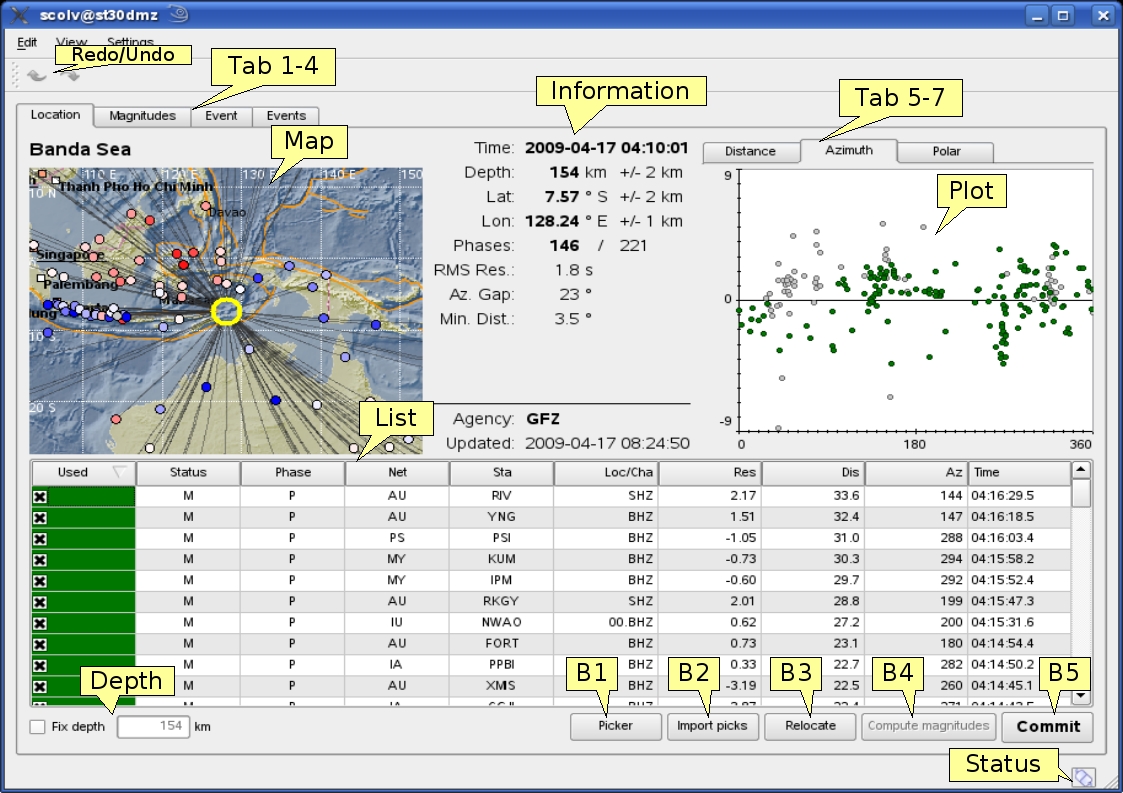
Figure 5-11: Location tab of the scolv. Residual plot for azimuth of the stations. Other features like in Figure 5-10.
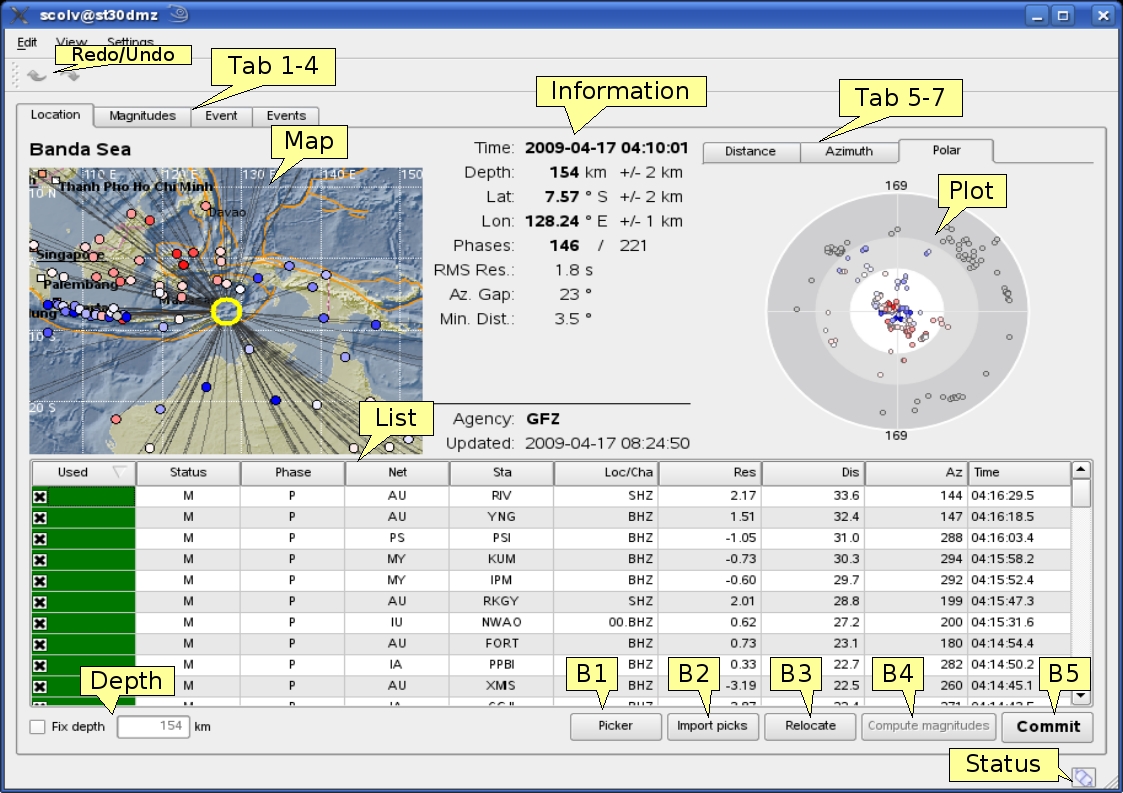
Figure 5-12: Location tab of the scolv. Residual plot for polar projected azimuth of the station. Other features like in Figure 5-10.
When an event is relocated new magnitudes can be calculated by using the “Compute Magnitudes” button in the “Location” tab. The advantage of calculating the magnitudes before commiting the new origin is the possibility to check the resulting magnitudes before they are published to the system. A window will appear giving the progress information of computation which will be confirmed by “ok”.
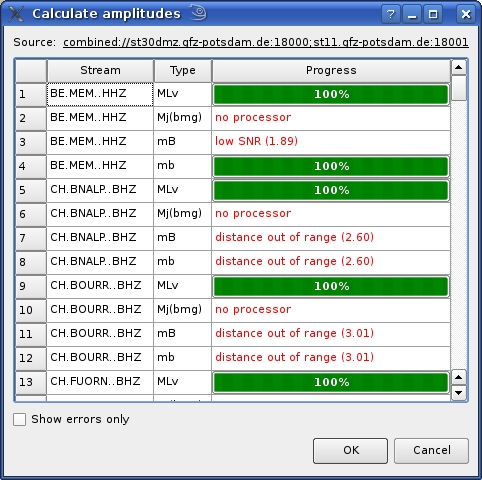
Figure 5‑13: Calculate magnitudes window of the scolv. After a relocation of an event the magnitudes can be recalculated. This progress information window will appear and has to be confirmed by “ok”.
The “Magnitude” tab shows all available magnitude information for the chosen origin. For each of the different magnitude types (mb, mB, MLv, Mw(mB), Mjma) the station magnitudes are shown in the magnitude residual plot and the table. The residual plot visualizes the difference between the station magnitude and the network magnitude for the different station distances. After relocation the magnitude can be recalculated by the “Compute Magnitudes” button. Station magnitudes can be deselected for computation. Normally, the 12%-trimmed mean is calculated as network magnitude to stabilize the result against a few outliers.
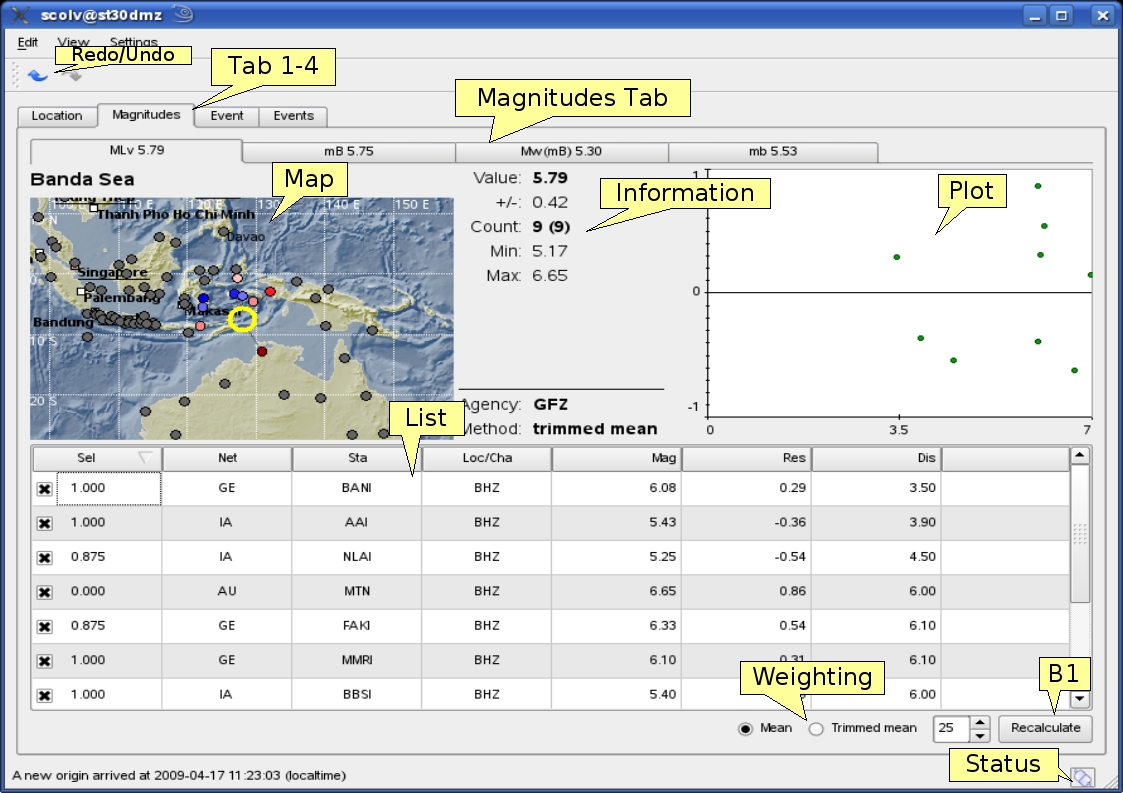
Figure 5‑14: Magnitudes tab of scolv. Map = map with residual and status of the station magnitude, filled circles show stations which delivered a magnitude, empty circles represent for which no magnitude was calculated; Magnitudes Tab = each magnitude and the residuals are displayed in a separate tab, no residuals are displayed for deduced magnitudes like Mw(mB) or M; Information = Magnitude information including network magnitude value, magnitude error, number of used and available station magnitudes and minimum/maximum station magnitude; List = Station magnitude table with the weights; Plot = station magnitude residual from network magnitude (distance over residual); Weighting = weighting scheme for the network magnitude; B1 = Recalculation of the network magnitudes; Status = Connection status.
The “Event” tab gives all information of associated orgins and magnitude of the actual event. Here the selection of the preferred origin and preferred magnitude can be influenced independent from scevent. The messaging between scevent and scolv about the selected orgins and magnitudes can be viewed in a window that has to be opened by pulling the left side frame to the right.
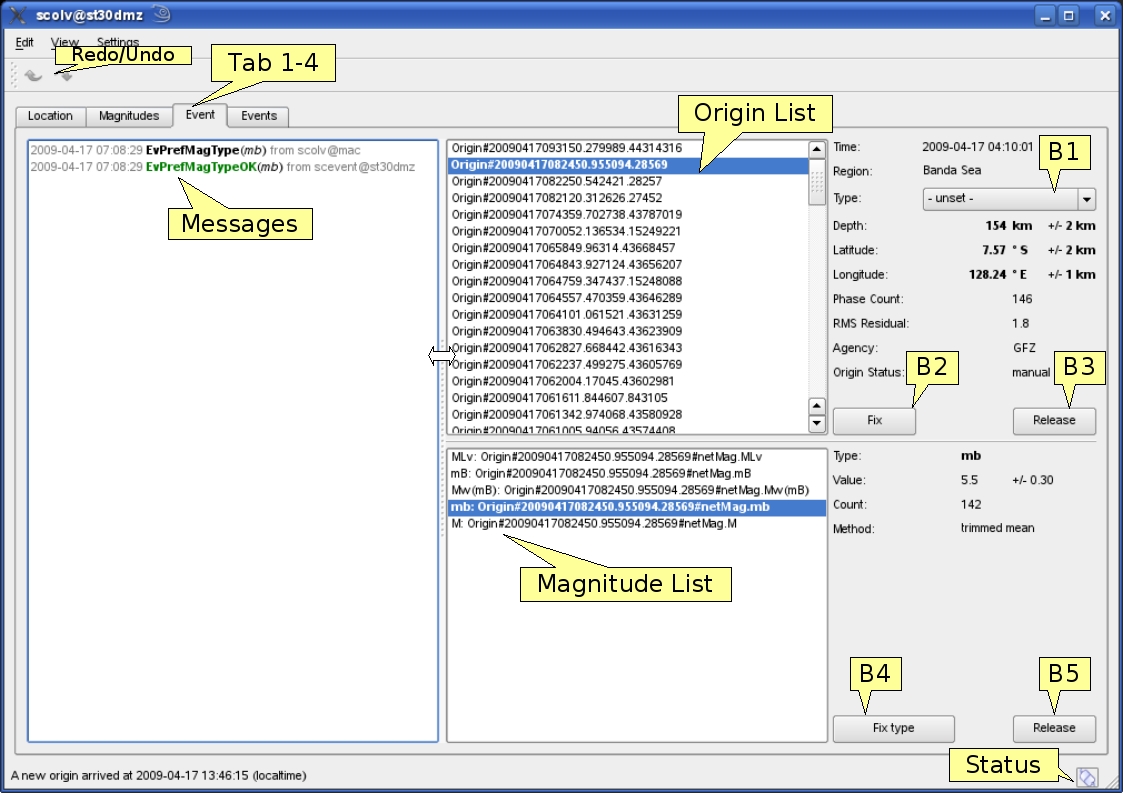
Figure 5‑15: Event tab of scolv. Origin List = list of all associated origins; Magnitude List = list of magnitudes of the actual origin; Messages = messages to scevent, visual after pulling the left frame to the right; B1 = Selector for the event type; B2 = button to fix the selected origin as preferred; B3 = button to let scevent select the preferred origin; B4 = button to fix the selected magnitude as preferred; B5 = button to let scevent select the preferred magnitude.
The “Events” tab gives an overview of the events in a defined timespan. Information about origin time, preferred (“best”) magnitude, preferred magnitude type, number of phases, epicenter and depth, origin status, region, agency and event/origin ID are similar to the event list in scesv. Additionally, all origins associated to one event are displayed when the sub-menu of the event is opened with the left-hand box.
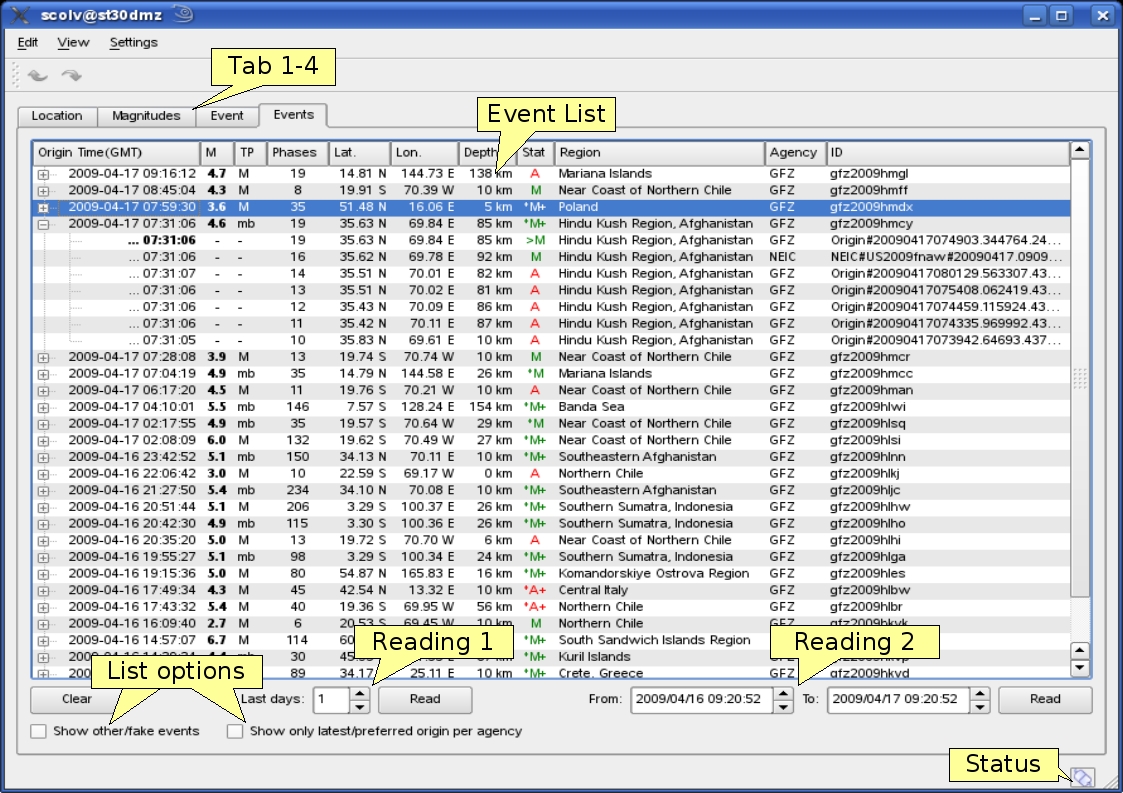
Figure 5‑16: Events tab of scolv. Event list = summary of events with status information that consist on the review status (automatic, manual or confirmed), the publish status (star) - the published origin is marked with > and imported origins from other institutes (+) that are identified by different agency IDs; Reading1 = Load events of the last days; Reading2 = Load events for specific timespan; List options = Show fake events and show only preferred/last origin per agency; Status = Connection status.
The Manual Picker is designed to review or revise the automatic picks and to pick manually. It provides picking, zooming/scaling, filtering, phase aligning, sorting, component selection and adding stations and relocating. In the lower part an overview of the traces is shown. The zoomed trace in the upper part enables more precise picking, but also rough picking in the lower part is possible.
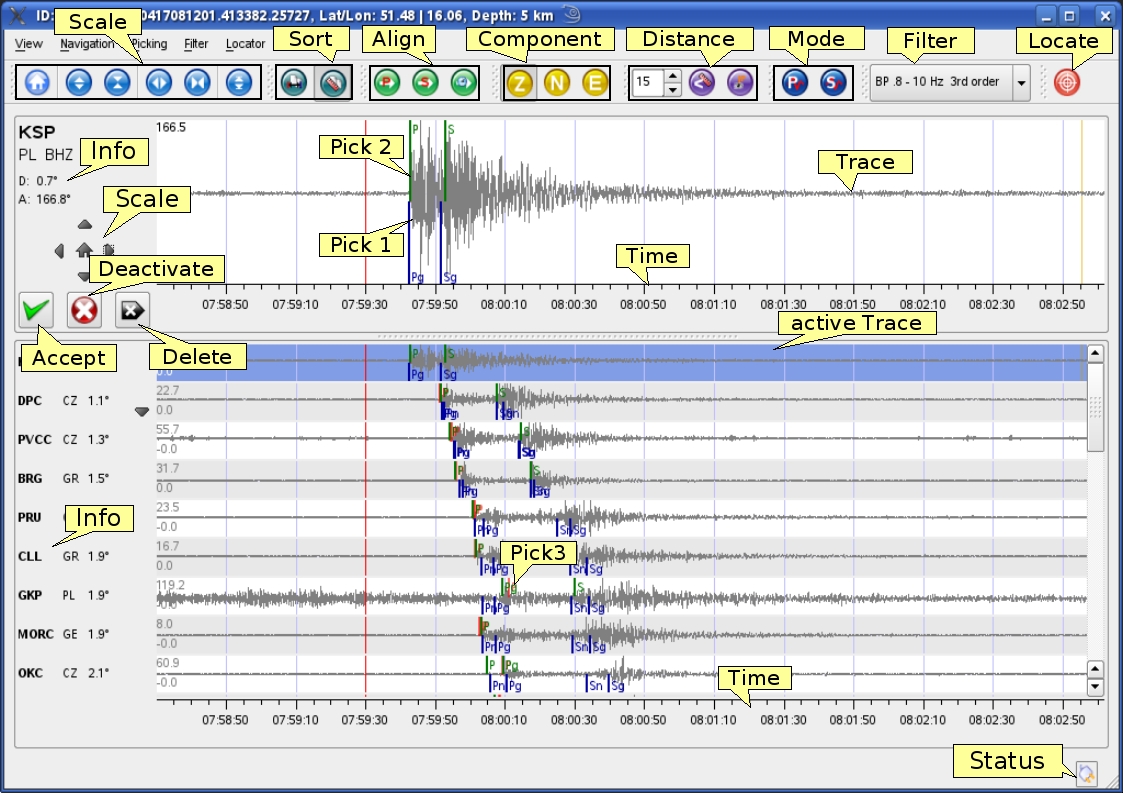
Figure 5‑17: Manual Picker of scolv. Scale = Time and amplitude scaling of the trace overview and/or the zoomed trace; Sort = Sorting of traces by residual or distance; Align = Aligning traces by P- or S-phase or by origin time; Component = Selection of Z-, N- or E-component; Distance = Loading all stations in a defined distance range and toggle display of all traces or only active traces; Mode = Choose picking mode; Filter = Selector of predefined filters, Locate = Button to relocate with the actual picks; Info = Stream information of the zoomed trace; Accept = accept a pick; Deactivate = De-/Reactivating an active or deactivated pick; Delete = Deleting the actual manual pick; Pick1 = theoretical; Pick2 = manual pick (green); Pick3 = arrival unassociated automatic pick (light red), associated picks (dark red); Time = time scale (absolute in origin time alignment, relative in phase alignment); Active trace = Selected trace shown in zoom window; Status = connection status.
The Manual Picker can be configured by the dialog shown in Figure 5-18. The dialog allows changing the waveform data source. To tune performance it is possible to reduce the waveform time window, to load only the Z-components instead of the Z-, N- and E-components and to exclude the strong motion data. The settings dialog also enables to define individual filters.
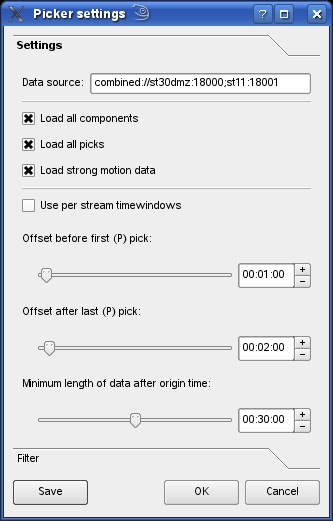
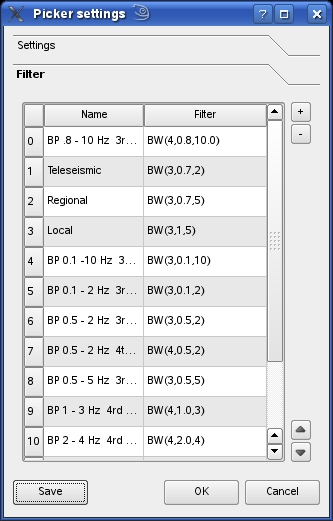
Figure 5‑18: Manual Picker settings dialog. The window of general settings and filter settings are alternately displayed by clicking the text.
Options
scolv supports configuration by file (scolv.cfg)
Configuration
- enableMagnitudeCalculation <bool> [false]
- Enable compute magnitude button
- filters <list>
- Defined filters for Manual Picker. Can have a label like ” Teleseismic;BW(3, 0.7,2) ”.
- picker.phases <list>
- Phases which can be picked, e.g. picker.phases= P, Pg, Pn, pP, S
- picker.loadAllComponents <flag> [1]
- Load all ![1] or only Z−component ![0]
- picker.loadAllPicks <flag> [1]
- Load all ![1] or only assigned picks ![0]
- picker.loadStrongMotion <flag>
- Load strong motion data: yes = 1, no = 0
- picker.preOffset <int> [60]
- Define in the timewindow in Manual Picker for align mode the time before the alignment time in seconds
- picker.postOffset <int> [120]
- Define in the timewindow in Manual Picker for align mode the time after the alignment time in seconds
- picker.minimumTimeWindow <int> [1800]
- Time window length shown in Manual Picker in seconds
Example of scolv.cfg:
connection.username = scolv2x1
commands.target = ".*x1$"
enableMagnitudeCalculation = false
filters = ”BP 1-3Hz 4rd order;BW(4,1.0,3)”, ”Teleseismic;BW(3,0.7,2)”, ”Regional ;BW(3,0.7,5) ”
picker.phases = P, Pg, Pn, pP, S
picker.loadAllComponents = 1
picker.loadAllPicks = 1
picker.loadStrongMotion = 0
picker.preOffset = 60
picker.postOffset = 120
picker.minimumTimeWindow = 1800
Hotkeys and Mouse interactions
”Location” tab:
| Hotkey | Description |
| F2 | Setup connection dialog |
| F3 | Picker settings dialog |
| F8 | Display event summary |
| F9 | Show ray paths and associated stations |
| F10 | Show event list |
| F11 | Toggle fullscreen |
| CTRL+Z | Undo |
| CTRL+Shift+Z | Redo |
| Mouse wheel | Zoom map in/out |
| Double click (left) | Center map |
”Magnitudes” tab (additional functions to “Location” tab):
| Hotkey | Description |
| up/down | Change magnitude type |
Manual Picker:
| Hotkey | Description |
| F3 | Add station |
| F5 | Relocate |
| Y | Decrease row height in trace overview |
| SHIFT+Y | Increase row height in trace overview |
| S | Maximize visible amplitudes |
| F | Toggle filter |
| Z | Switch to Z-component |
| N | Switch to N-component |
| E | Switch to E-component |
| > | Increase time scale in trace overview |
| < | Decrease time scale in trace overview |
| SHIFT+N | Default view |
| CTRL+UP | Amplitude zoom in |
| CTRL+DOWN | Amplitude zoom out |
| CTRL + RIGHT | Time zoom in |
| CTRL + LEFT | Time zoom out |
| CTRL + 0 | Align by origin time |
| CTRL + 1 | Align by P arrival |
| CTRL + x(see Number keys) | Align by S arrival |
| CTRL + MouseWheel(MW) up | Amplitude zoom in |
| CTRL + MW down | Amplitude zoom out |
| SHIFT + MW up | Time zoom in |
| SHIFT + MW down | Time zoom out |
| CTRL + SHIFT + MW up | Time and amplitude zoom in |
| CTRL + SHIFT + MW down | Time and amplitude zoom out |
| LEFT | Move traceview to left (fine) |
| RIGHT | Move traceview to right (fine) |
| SHIFT + LEFT | Move traceview to left (rough) |
| SHIFT + RIGHT | Move traceview to left (rough) |
| UP | Scroll up (through the traces) |
| DOWN | Scroll down (through the traces) |
| ALT+RIGHT | Jump to next marker (picking mode) |
| ALT+LEFT | Jump to previous marker (picking mode) |
| ESC | Leaving picking mode |
| ALT+D | Sort by distance |
| ALT+R | Sort by residual |
| Number keys | Pick x. defined phase, e.g. 1=Pick P-phases (configurable) |
Use Cases
- Choose origin from event list
-
- Press F10 to show the event list (in “events” tab)
- Double click on the line of the event to show belonging preferred origin or open the event tree to choose a non preferred origin
- Select defining phases for relocation
-
- In “location” tab: At the left side of the phase list click (left mouse button) in the check boxes of the column ”Used” to select or deselect phases or
- Click (left mouse button) on the station symbols in the map to select or deselect phases or
- Click (left mouse button) on the station symbols in the residual plot to select or deselect phases for the next relocation or
- Select in the residual plot a rectangular area with the mouse (left mouse button) to select phases
- Zoom residual plot in
-
- Press the ”shift”-key and use the mouse to select a rectangular area in the residual plot and zoom this area or
- Press the right mouse button and chose ”Zoom into selected values”
- In zoom view the right y-axis and the top x-axis are red colored.
- Zoom residual plot out
-
- Press the right mouse button
- Choose ”Reset Zoom”
- Fix depth
-
- Activate ”Fixed Depth” check box in “location” tab
- Type depth in the text entry field
- Import picks
-
- Press the button ”Import Picks” to import picks of latterly origins in “location” tab
- Choose last origin, origin with maximum picks or choose all origins. Once you made your choice an automatic relocation is done
- Open Manual Picker/Show waveforms
- Press the button ”Show Waveforms” in ”location” tab
- Relocate earthquake
-
- Perform use case ”Select defining phases for relocation”, ”Fix depth”, ”Import picks” or “Pick Phases”
- Press the button ”Relocate” in necessary
- Precalculate magnitudes
-
- Press relocate
- Press Compute magnitudes button
- Press ok
- Go to magnitude tab
- Set preliminary origin
-
- Press the mid mouse button in the map of the “location” tab
- Undo/Redo
-
- Press the ”Undo” or ”Redo” button to switch between location results or
- Use menu, press ”Edit” and ”Undo” or ”Redo”
- Show origin specific magnitudes
-
- Choose the ”Magnitudes” tab
- Click on the ”Type” combobox
- Choose one magnitude
-
- Identify a station magnitude
- Click on a magnitude symbol in the map or the station magnitude residual plot to check or
- Click in the checkboxes in the column “Sel” of the ”Station Magnitudes” table
- Identify stream with large residual
- Click a large residual in the residual plot
- Go to the Manual Picker, the belonging trace is selected
- Use temporary filter
-
- Open external editor (or equivalent)
- Type the temporary filter, for example BW(3,0.7,2)
- Mark the string
- Transfer it via drag & drop to the trace list of the Manual Picker (the filter is applied to all traces)
- Pick phases
-
- Choose P/S picking mode (Fig. 5-14 “Mode”)
- Double click in zoomed trace or use arrow keys to move pick cursor and press return to set pick
- Pick P-phase
-
- Press the button to align by P-phase
- Choose Z component
- Choose filter
- Follow use case ”Pick phases”
- Pick S-phase
-
- Press the button to align by S-phase
- Choose N/E component
- Choose filter
- Follow use case ”Pick phases”
- Pick detailed phases
-
- Go to to the menu, choose picking
- Select the phase
- Follow use case Pick phases
Attachments
-
Events_tab_of_scolv.jpg
 (473.9 KB) - added by jabe
-
Event_tab_of_scolv.jpg
(263.4 KB) - added by jabe
-
Location_tab_azimuth_of_scolv.jpg
(410.1 KB) - added by jabe
-
Location_tab_of_scolv.jpg
(434.3 KB) - added by jabe
-
Location_tab_polar_projected_of_scolv.jpg
(395.5 KB) - added by jabe
-
Magnitudes_tab_of_scolv.jpg
(311.6 KB) - added by jabe
-
Manual_picker_filter_settings_dialog_of_scolv.jpg
(61.1 KB) - added by jabe
-
Manual_picker_of_scolv.jpg
(413.9 KB) - added by jabe
-
Manual_picker_settings_dialog_of_scolv.jpg
(49.5 KB) - added by jabe
-
Calculate_magnitudes_window_of_scolv.jpg
(127.5 KB) - added by jabe


